Облачный сервис IPEYE
Для этого вам нужно узнать статический IP-адрес вашей камеры и настроить ее так, чтобы она могла иметь доступ в Интернет (информацию о том, как это сделать, запросите у производителя камеры).
В Личном кабинете выберите «Устройства», а затем «Добавить камеру» и заполните необходимые поля.
Видеоинструкция по добавлению камер без встроенной поддержки сервиса IPEYE
Для предоставления стороннего доступа к группе камер можно воспользоваться тремя основными способами:
I. Предоставление онлайн доступа по внешней ссылке (без использования логина и пароля)
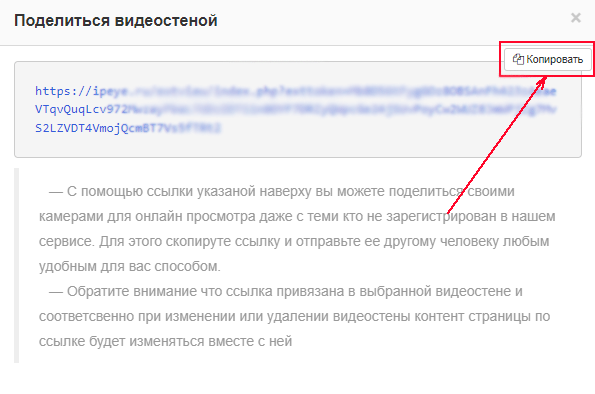
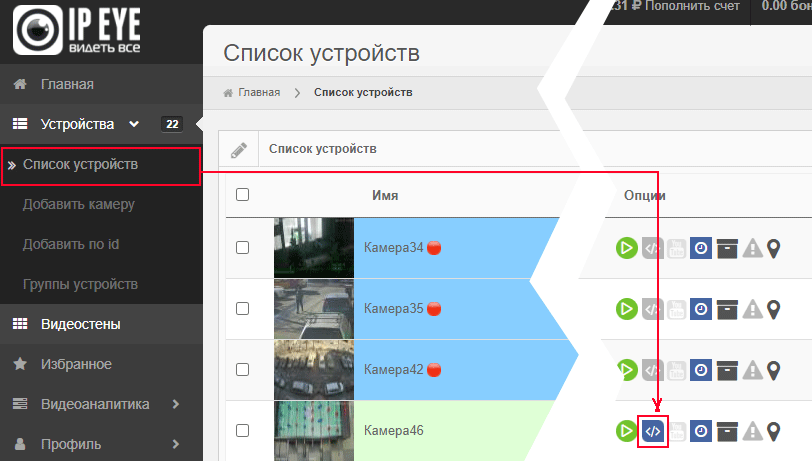
Для этого воспользуйтесь разделом «Видеостены», доступным в меню в левой части web-версии личного кабинета (подробную информацию по использованию видеостен можно получить из Руководства пользователя).
Этапы по предоставлению доступа данным способом:


Далее, при вставке полученной ссылки в браузере будут отображаться онлайн потоки со всех камер видеостены, находящихся на платных тарифах либо на бесплатном тарифе с опцией «Расширенный доступ».
II. Предоставление настраиваемого доступа к выбранным камерам путем предоставления задаваемого пользователем логина и пароля.
Вы можете предоставить доступ ко всем либо к отдельным камерам личного кабинета, находящимся на платных тарифах (либо на бесплатном тарифе с опцией «Расширенный доступ») другим пользователям, создав для них дополнительную учетную запись. Более подробную информацию как это сделать, можно найти в Руководстве пользователя.
III. Предоставление доступа к онлайн трансляции с камеры либо к онлайн трансляции + к архиву с камеры на стороннем сайте.
Вы можете предоставить доступ ко всем либо к отдельным камерам личного кабинета, находящимся на платных тарифах либо на бесплатном тарифе с опцией «Расширенный доступ». Для этого:
Более подробную информацию, как это сделать, можно найти в Руководстве пользователя

Кроме описанных способов существует также возможность предоставления доступа путем размещения на сторонних площадках, таких как YouTube, Twitch и другими способами. Более подробную информацию можно получить, направив запрос нам на почту по адресу info@ipeye.ru
Для подключения камеры к облачному сервису вам не нужно устанавливать специальное программное обеспечение. Все, что необходимо, — это сама камера встроенным облачным сервисом IPEYE и роутер с доступом в Интернет. Настроить камеру можно, набрав в адресной строке браузера локальный IP-адрес камеры. Вы попадете в веб-интерфейс, где сможете изменить сетевые настройки камеры, если это необходимо. Для этого:
Если все настройки были сделаны правильно, в пункте «Облако IPEYE», справа, в разделе «Статус сервиса» вы увидите полученный ID камеры. В строке «Подключение» должно отображаться: «Сервис IPEYE доступен».
Все, что вам осталось сделать, — это ввести логин и пароль от вашего Личного кабинета и от камеры на сайте ipeye.ru (по умолчанию логин и пароль от камеры: admin/admin). Как только вы нажмете «Готово» и увидите надпись «Камера добавлена в облако и доступна в Личном кабинете», настройка будет завершена.
Да, можно, для этого вам понадобится видеорегистратор с поддержкой протокола RTSP, а также получить у вашего Интернет-провайдера статический IP адрес. Также в настройках роутера пробросить порт RTSP потока с регистратора. Далее добавление каждого канала регистратора в Личный кабинет производится аналогично добавлению IP камер.
Проверьте доступность RTSP-порта камеры через раздел «Помощь»
В подразделе «Тестовая площадка» укажите белый статический IP-адрес и номер проброшенного RTSP-порта, после чего нажмите кнопку «Проверить». Если порт открыт, то на зеленом фоне будет отображено сообщение «Online»
Проверьте правильность формата адреса потока
Для проверки корректности формата RTSP-ссылки можно воспользоваться VLC-плеером, скачать который можно здесь.
Откройте меню «Медиа» => «Открыть URL» и в поле «Введите сетевой адрес» введите RTSP-ссылку, а затем нажмите кнопку «Воспроизвести». Если RTSP-ссылка корректна, то в плеере через несколько секунд начнется воспроизведение видео с камеры.
Обратите внимание - при проверке ссылки с компьютера находящегося в той же локальной сети что и камера вы увидите в плеере видео, даже если в ссылку вписать локальный IP-адрес камеры, Проброс RTSP-порта при этом делать необязательно.
Вероятными причинами могут быть:
Зайдите в Личный кабинет. Перейдите в раздел «Профиль» личного кабинета и затем в подраздел «Пополнить счет». Выберите период, на который хотите оплатить услуги сервиса или вручную введите в соседнем поле сумму. Затем нажмите кнопку «Оплатить» - произойдет переход на страницу оплаты.
Зайдите в Личный кабинет. В правом верхнем углу нажмите «Пополнить счет». Выберите вкладку «Активировать карту оплаты» и введите код авторизации.
Выполните следующие шаги:
В Личном кабинете выбрать «Устройства» - «Добавить по id». Далее:
Если все было сделано правильно - камера будет добавлена в Личный кабинет.
Данные тарифы имеют ограничение по битрейту - до 500 кбит/с. Поэтому, чтобы подключить камеру к такому тарифу, необходимо в настройках вашей камеры выставить соответствующее ограничение битрейта. После этого тарифы станут доступны для подключения в течение 24 часов.
Выполните следующие шаги:
Общий доступ, далее в таблице слева
Я делюсь с ниминажать
плюсик, во всплывающем окне ввести video_ozon@ozon.ru и нажать
Сохранить.
Для этого надо написать письмо в свободной форме с электронной почты, привязанной к текущему владельцу аккаунта IPEYE, в котором указать:
Откройте инструкцию по настроке видеонаблюдения для Яндекс-Маркета
Камеры IPEYE по умолчанию имеют IP адрес 192.168.1.18, вы можете получить доступ к камере, введя в адресной строке браузера Internet Explorer http://192.168.1.18
Для корректной работы через браузер необходимо установить ActiveX плагин и обновить страницу. Также убедитесь, что для данной страницы в браузере отключена блокировка всплывающих окон.
Скорее всего, адрес сети, указанный в настройках Ethernet адаптера вашего компьютера отличается от адреса сети камеры. Для решения проблемы необходимо изменить IP адрес Ethernet адаптера вашего компьютера так, чтобы он совпадал с адресом сети IP камеры IPEYE, например, назначив ему адрес 192.168.1.100.
Основной поток задается в формате: rtsp://логин:пароль@адрес/1/h264major
Для настроек камеры по умолчанию: rtsp://admin:admin@192.168.1.18/1/h264major
Дополнительный поток задается в формате: rtsp://логин:пароль@адрес/1/h264minor
Для настроек камеры по умолчанию: rtsp://admin:admin@192.168.1.18/1/h264minor
Для получения удаленного доступа к камере со встроенным облачным сервисом IPEYE через сеть Интернет (например, для записи на сетевой видеорегистратор или ПО видеонаблюдения) необходимо:
Данные порты можно изменить через настройки камеры: «Сеть и сервисы» - «PORT».
Рекомендуем вам использовать облачный сервис IPEYE ipeye.ru, который позволяет вести просмотр и запись медиапотока с камер IPEYE без получения статического адреса.
Кроме IP камеры с поддержкой технологии PoE, вам понадобится коммутатор (switch) или сетевой видеорегистратор (NVR), соответствующий стандарту IEEE 802.3af-2003 и поддерживающий питание внешних устройств по методу «А» (передача электропитания по сигнальным проводам).
Максимальная длина сегмента не регламентируется и зависит от многих параметров: производителя и марки PoE-оборудования, характеристиками используемого кабеля, потребляемой подключенным устройством мощности, наличием внешних электромагнитных помех и т.п. Как правило, не рекомендуется превышать значение в 70 метров.
В Клиенте видеонаблюдения UC откройте вкладку «Конфигурация», ниже кнопку «Устройства», слева в «Списке устройств» выделите нужную камеру. Далее справа в «Основных настройках» в поле «Пароль» введите «admin» без кавычек и нажмите «Изменить». После этого во вкладке «Видео» изображение с камеры должно отображаться нормально.
Скорее всего, свитч поддерживает метод подключения «B» (задействует по 2 раздельных пары для питания и сигнала), который электрически несовместим с методом «А» (питание и сигнал по 2 парам), который используют камеры IPEYE. Решение – замена свитча на совместимый с методом «А», либо использование переходников «метод A» - «метод B».
Нужно ввести в браузере на устройстве, подключенном к той же сети, что и камера, запрос следующего вида:
http://servername/cgi-bin/sensor.cgi?userName=username&password=password&action=set&type=mirror&vertical=%d&horizontal=%d
servername - локальный IP адрес камеры;
username - имя пользователя (admin);
password - пароль пользователя (admin);
%d – прописать 1 для переворота изображения, 0 - для возврата по умолчанию;Например, для камеры «из коробки» запрос будет выглядеть следующим образом: http://192.168.0.120/cgi-bin/sensor.cgi?userName=admin&password=admin&action=set&type=mirror&vertical=1&horizontal=1
| Набор кодеков и плеер для просмотра файлов из архива K-Lite Codec Pack Full | Скачать |
| Приложение для записи видео с экрана монитора «IPEYE Recorder» | Скачать |
| Программа для поиска камер Spacecam внутри локальной сети | Скачать |
| Программа для удалённого доступа к рабочему столу «Ассистент» | Скачать |
| Программа для удалённого доступа к рабочему столу «AnyDesk» | Скачать |
| Приложение «IPEYE Android» | Скачать |


| Функционал облачного сервиса IPEYE | Открыть |
| Руководство к Web-интерфейсу камер IPEYE | Открыть |
| Руководство к личному кабинету пользователя сервиса IPEYE | Открыть |
| Руководство к мобильным приложениям IPEYE | Открыть |
| Руководство к разделу видеоаналитики IPEYE.SMART | Открыть |
| Руководство к настройке раздела видеоаналитики IPEYE.SMART 2.0 | Открыть |
| Руководство по подключению и настройке тепловых карт | Открыть |
| Зачем нужны тепловые карты. Презентация. | Открыть |
| Руководство по поиску в архиве IPEYE | Открыть |
| Руководство IPEYE.BOX | Открыть |
| Руководство по трансляции с IOS через приложение IPEYE | Открыть |
| Руководство по функционалу детекции движения | Открыть |
| Предоставление доступа к камерам для Яндекс-Маркета | Открыть |